Home FAQ

Frequently Asked Questions

Frequently Asked Questions

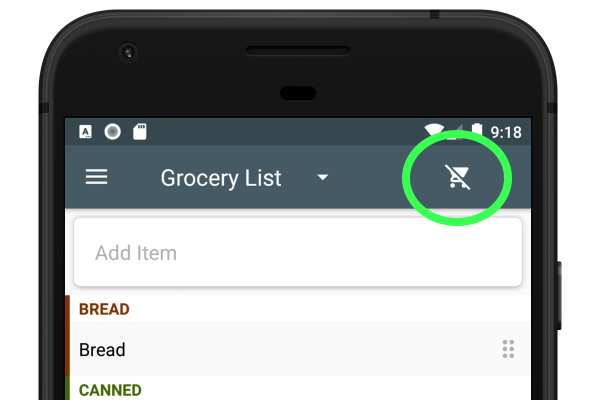
The grocery list has two modes: editing mode and shopping mode. Use the shopping cart button ( / ) to toggle between these two modes. The add item bar and banner ad disappear when in shopping mode to maximize screen space.

Editing Mode ()

In editing mode, you can:

  • Click an item to edit it (change name, quantity, category, notes, etc...).
  • Swipe right or left on an item to delete it.
  • Drag an item to change its category or re-arrange the list (long click on the row or use the icon).
  • Click the "?" icon to verify that you need an item.

Shopping Mode ()

Shopping mode is designed to be as simple as possible to make your shopping trip as easy as possible! In shopping mode you can:

  • Click an item to move it to the cart.
  • Click an item in the cart to move it back to the list.

To add a new recipe, you can use the "+" button on the recipe page, or add it directly from the web (see the next question).

If you add it manually, the reference line could be a page number in your cookbook, or a web link. If it is a web link a button will be shown to let you go to that page easily from the recipe, and you can use the "Fetch Ingredients" button to try to automatically fetch the recipe ingredients from the web page.

Grocery Pro supports recipe import from many common websites, including Epicurious, Allrecipes, Betty Crocker, and hundreds of common recipe blogs that use the Google recipe format. If you find a format that isn't supported, feel free to email us the link and we'll see if we can add it!

When you find a recipe you want to keep, just find the browser's "Share" button in the menu and send it to Grocery Pro. It will save the link, and try to download the ingredients too!

On the recipe page, click the button on a recipe card to add that recipe to the menu.

You can remove a meal by swiping, and re-arrange meal orders by clicking on them. To add notes, instructions, or extra ingredients to a meal (sides, etc...) you can click on the meal to show an interactive dialog.

The meal reference is copied from the recipe that created it. If the reference is a web link, a button will be shown to take you to the associated web site.

On the meal page, click the button on a meal card to add that meal's ingredients to the grocery list. Once a meal's ingredients have been added to the list, it is marked with the "Added" badge so you remember which ones you've added. All ingredients added this way will be marked with "Check if we need it" and will have a "?" shown on the list to remind you to check the pantry first.

If you click the button in the top corner, it will add all the meals and weekly staples to the grocery list.

When adding ingredients, you will see a list of ingredients to add. If you know you don't need something, you can simply swipe it off the list.

The bottom navigation is on by default, but if you like to maximize screen space you can turn it off and just use the top left menu to navigate in the app. You can control whether to show or hide the bottom navigation from the app settings. Click the top left menu to get to the app settings.

Yes! If you've already started using the app and want to access the full feature set and secure your data by signing in, just choose "Create Account" on the sign-in page and your data will be automatically migrated to your new account.

Please note that if you have entered data and then choose to sign in to an existing account, the data you have entered will not be migrated!